-
Introduction
-
Logging in
- Walkthrough
-
The End
OverTheWire - Bandit
Introduction
Bandit is just one of several wargames available at overthewire.org. It's aimed at beginners to Linux and CTFs and provides an excellent introduction to the basics of the Linux command line.
In this walkthrough I'm going to show the process for solving each challenge while also providing some insight into what each challenge is trying to teach and why it's useful, so keep an eye out for callouts like those below.
Access to each Bandit level is made over SSH. The username will correspond to the index of the level starting at 0. Always make sure you're logging into the correct Bandit level!
If you're looking for the solution of a particular level, you are highly encouraged to attempt it on your own before following this walkthrough. You will learn some useful things regardless, but attempting it on your own first will help the knowledge stick better. I promise.
I have a few recommendations before getting started. Most of the OverTheWire Bandit levels provide links to potentially useful manual pages. Unfortunately the man pages can be somewhat cryptic, especially for beginners. For that reason I recommend the following steps to try to get unstuck when slogging through the man pages for any particular command.
- Search for examples. Many
manpages contain examples of their usage. These may be marked by all-capsEXAMPLESin some cases, but sometimes not. - If skimming through the man pages doesn't surface any apparent examples, then you may want to refer to cheat.sh. Cheat.sh is a database of usage examples for thousands of command line programs. It can be searched from the main page or by simply adding a
/followed by the command. For example https://cheat.sh/ssh will return examples ofsshusage. This one can be helpful when trying to understand how a command is commonly used and which command flags are most useful. - If you're struggling to understand some of the examples then paste them into https://explainshell.com. Explainshell provides a more readable breakdown of each command line flag and argument. This tool can save you a lot of time flipping back and forth through the
manpages.
Please also note that for any terminal output, the command prompt will be truncated to a single $ for brevity. Just remember that you'll need to be logged in to the appropriate level before executing any of the commands.
For example:
$ cat hello.txt
Hello there!
Logging in
The goal of this level is for you to log into the game using SSH. The host to which you need to connect is bandit.labs.overthewire.org, on port 2220. The username is bandit0 and the password is bandit0. Once logged in, go to the Level 1 page to find out how to beat Level 1.
Bandit 0 provides an introduction to SSH and provides a couple useful links for further research.
Firstly, let's discuss what SSH is and how it's used day-to-day. SSH is a networking protocol that allows secure communication between networked computer systems. This is distinct from the ssh command line program linked above. The program implements the protocol and allows regular users to utilize the SSH protocol for secure communication. The security of SSH is based on public-key cryptography which you're welcome to read more about, but many of the details are out of scope for this walkthrough.
The most important thing you need to know about SSH is that it can be used to login to a computer system with a username and password just as if you were physically present. Except in this case it's another system accessible over the network. This is how it will be used over the course of the Bandit wargame as well as some of the other wargames by OverTheWire.
It's worth mentioning that SSH is usually (and preferably) used with an SSH key. More specifically a key-pair. A public key and a private key which are both needed to take advantage of the aforementioned public-key cryptography. I won't go into detail here, but don't worry there are a couple later levels that do utilize SSH keys, so I'll discuss them in more detail when we reach them.
The prompt tells us that both the username and password are bandit0.
Just as important though, is the network location we've been provided, bandit.labs.overthewire.org, which we'll use to connect to level 0. Actually, bandit.labs.overthewire.org is what's known as a hostname or domain name. More specifically, it's a fully qualified domain name (FQDN). You can recognize an FQDN because it will include a top-level domain (TLD) such as .com, .net, or .org. This naming system for computers is called the Domain Name System (DNS). Luckily we don't need to dig into the details here. Just know that one of these FQDNs will resolve to an IP address which can (usually) be used to uniquely identify a computer system on the internet.
This unique name will tell the ssh program what system to connect to. The ssh program expects the user credentials and hostname in the following format ssh://[user@]hostname[:port]. This is explained in the first couple paragraphs of the ssh man page.
ssh connects and logs into the specified destination, which may be specified as either
[user@]hostnameor a URI of the formssh://[user@]hostname[:port].
The elements wrapped in brackets [ and ] are actually optional. Linux man pages will commonly express the available flags and arguments for a command in this way.
With that knowledge we can now connect to the first level with this command.
ssh ssh://bandit0@bandit.labs.overthewire.org:2220
You should be greeted by a banner for the Bandit wargame and a prompt requesting entry of the bandit0 password. Enter bandit0 and you're ready to get started.
It isn't necessary to solve any of the Bandit levels, but I highly recommend researching DNS. It's intrinsic to how the internet operates and you'll likely encounter it again and again if you pursue any area of IT, software, or cybersecurity.
Resources:
- What is DNS?: an excellent intro to the basics of DNS by freeCodeCamp
- Implement DNS in a weekend: if you have some programming experience, I highly recommend following this walkthrough by Julia Evans
Walkthrough
Level 0
Now that we're logged in, it's time to solve the first level.
The password for the next level is stored in a file called readme located in the home directory. Use this password to login to
bandit1using SSH. Whenever you find a password for a level, use SSH (on port 2220) to log into that level and continue the game.
Useful commands 1
The prompt also provides links to the man pages for several commands.
With perhaps the exception of du. Each of these commands is fundamental for any Linux user who wants to effectively use the command line.
| Command | Description |
|---|---|
| ls | list the files in a directory |
| cd | change your current directory |
| cat | display the contents of a file |
| file | display information about the content of a file |
| du | display the disk space used by files |
| find | search the file system for files with various parameters such as filename, file type, file size, etc. |
You are highly encouraged to review each of the commands. At the very least check out the cheat.sh page for each. Regardless these are all pretty common, so you'll get plenty of experience with these commands in later levels.
For now, it should be apparent that one of the above commands should serve to show us the contents of the readme file mentioned in the prompt. The humble cat command.
It takes a filename as a parameter. So providing it with the filename readme should print it's contents.
$ cat readme
Congratulations on your first steps into the bandit game!!
Please make sure you have read the rules at https://overthewire.org/rules/
If you are following a course, workshop, walkthrough or other educational activity,
please inform the instructor about the rules as well and encourage them to
contribute to the OverTheWire community so we can keep these games free!

The password you are looking for is: [REDACTED PASSWORD]
I won't be providing any of the passwords throughout this walkthrough per the OverTheWire rules. So get out your notepad and copy those passwords. You'll need them to return to the last level you've completed without completing each level again. Once you've done that, you're ready to continue to Level 1.
Level 1
The password for the next level is stored in a file called
-located in the home directory
The prompt also provides links to the man pages for the same commands as level 0.
Naturally, you might think to try the cat command again. Afterall, we're told the password in in the file called -. Let's try it and see what happens.
$ cat -
█
Strange, you're left with a blank line on the terminal now. And, if you type some text and press the Enter key, the text is repeated back to the terminal like so.
$ cat -
hello there
hello there
The reason for this will become clear if you read the description from the cat man page.
NAME
   cat - concatenate files and print on the standard output

SYNOPSIS
   cat [OPTION]... [FILE]...

DESCRIPTION
   Concatenate FILE(s) to standard output.
   With no FILE, or when FILE is -, read standard input.
So, according to the description, the parameter -, makes cat read from standard input. You may have guessed this already, but standard input or STDIN is usually what's entered by the user in the terminal; however, STDIN doesn't explicitly refer to input from a user. Rather, it refers to a stream of data that is being sent to a program, so it may also refer to files or even the output of other programs that is being passed to other programs.
You'll most likely hear of this concept of input and output referred to as STDIO or standard input and output. If you'd like to read more, there is an excellent article by freeCodeCamp explaining more about it and many other useful concepts.
There will be opportunities to demonstrate STDIO and IO redirection later, but for this level, all you need to recognize is that - is a special character that tells cat to read input from STDIN instead of a file as we saw before. So to properly refer to the - file, it must be referenced by some other means than the simple filename. There are several ways to accomplish that.
-
Use
./<filename>where<filename>would be-for this example. The.is a special character that is interpreted as the current directory. This is usually implied when we just enter a file by it's name. However, stating it explicitly allows us to circumvent the special case of using-as an argument tocat.$ cat ./- [REDACTED PASSWORD] -
Use the full path. On Linux and other Unix-based systems the root of the file system can be specified with a
/. To use this method though we'll need to know the full path of the-file. To get that we can use thepwdcommand, which is short for "print working directory".$ pwd /home/bandit1To complete the full path for
-we just need to append/<filename>.$ cat /home/bandit1/- [REDACTED PASSWORD] -
We can also use what is called a glob (
*). The glob can be used to execute commands over multiple files at once. For example using the following command will print all files in the current working directory.$ cat ./* [REDACTED PASSWORD]In this example the only file in our current directory is the password file
-. But just like the other examples it circumvents the special-argument tocat.The glob is actually a part of a larger set of filename expansion features available in Bash. They're quite useful and we may see more of them in future levels.
The main takeway from this level is that there are special characters that may change how commands are interpreted on the command line. Some of them will be built-in to whatever shell you're using, but some may just be conventions like the - character for STDIN and won't apply to every program. Here is a breakdown of the special characters used in the Bash shell that you might want to watch out for. https://mywiki.wooledge.org/BashGuide/SpecialCharacters
Level 2
The password for the next level is stored in a file called
spaces in this filenamelocated in thehomedirectory
This level is similar to Level 1, except that the file is not a special character. Instead it contains special characters, the space █. The space character is essential for the shell to interpret the input text.
$ cat spaces in this filename
cat: spaces: No such file or directory
cat: in: No such file or directory
cat: this: No such file or directory
cat: filename: No such file or directory
As you can see from above, entering the name as it's written will cause the cat command to interpret each word in the file as a separate filename.
Just as before, there are a few ways to get around this.
-
Escape the space characters. In Bash, the backslash
\is used as an escape character. When the\is used, the following character is interpreted literally. This allows the space characters of the filename to be "escaped".$ cat spaces\ in\ this\ filename [REDACTED PASSWORD] -
Instead of escaping the spaces individually, the filename can also be surrounded by single quotes. Every character between two single quotes is interpreted literally.
$ cat 'spaces in this filename' [REDACTED PASSWORD] -
Similarly, double quotes can also be used to interpret the surrounded characters literally. However, there are some exceptions, and double quotes allow some special characters to be interpreted. But the space character is not one those, so it is functionally the same as the above example in this case.
$ cat "spaces in this filename"
[REDACTED PASSWORD]
Recognize that it's sometimes necessary to escape characters within filenames and other arguments.
Most Linux users will avoid naming files with any special characters, but sometimes you'll still run into them. This is especially true with files created on Windows where spaces inside file and directory names are much more common.
Level 3
The password for the next level is stored in a hidden file in the
inheredirectory.
$ ls ./inhere
According to the ls command, there don't appear to be any files in the inhere directory. That's because ls doesn't display hidden files by default.
To show hidden files with ls, it's necessary to use the --all or -a flag.
$ ls -a ./inhere
.  ..  ...Hiding-From-You
With the --all flag enabled, ls now shows all the files in the inhere directory. Including the hidden files. In Linux and other Unix-based systems, a leading dot . in a filename is used to indicate a hidden file. As such, you may here them referred to as dotfiles.
Now that we know the name of the hidden file, cat can be used to print the contents just as we've seen before.
$ cat inhere/...Hiding-From-You
[REDACTED PASSWORD]
The term "dotfile" is also frequently used to refer to a user's personal configuration files. This is because many configuration files follow the leading dot . convention, so they don't clutter up directory listings.
Some systems will have aliases for the ls command as well, with various flags enabled. Here a few common ones.
llforls -AlhFto list all files in a human-readable, long formatlaforls -Ato list all files excluding.and..lforls -CFto list files in a column formatlsdforls --group-directories-first
See this DigitalOcean article to learn more about common aliases and how to configure your own.
Level 4
The password for the next level is stored in the only human-readable file in the
inheredirectory. Tip: if your terminal is messed up, try theresetcommand.
If you haven't done so already, now would be a good time to read through the manual for each of the commands that were already mentioned in Level 0.
If you've read through the description for each, you should have a pretty good idea of which command you'll need to solve this one.
This level is asking us to identify which files in inhere are human readable. The file command can get the information we need.
From the file manual page we know that we can expect a response of text for any files that only contain typical ASCII characters.
The  type  printed  will  usually  contain one of the words `text` (the file
contains only printing characters and a few common control characters and is
probably safe to read on an ASCII terminal), `executable` (the file contains
the result of compiling a program  in  a form  understandable to some UNIX
kernel or another), or `data` meaning anything else (data is usually “binary”
or non-printable).
One option is to execute file on each file in inhere one-by-one like so.
$ file inhere/-file00
inhere/-file00: data
A better way is to use the glob * that we've seen previously. This allows us to run the file command on all the files at once.
$ file ./inhere/*
./inhere/-file00: data
./inhere/-file01: data
./inhere/-file02: data
./inhere/-file03: data
./inhere/-file04: data
./inhere/-file05: data
./inhere/-file06: data
./inhere/-file07: ASCII text
./inhere/-file08: data
./inhere/-file09: data
From here it's obvious that we want the file with the text data at ./inhere/-file07.
$ cat ./inhere/-file07
[REDACTED PASSWORD]
Always keep an eye out for opportunities to use globbing. Especially if you're running commands over a bunch of files.
Level 5
The password for the next level is stored in a file somewhere under the
inheredirectory and has all of the following properties:
- human-readable
- 1033 bytes in size
- not executable
This level requires a precise approach to locate the correct file. While it's technically possible to solve with just the ls and file commands. It would require some tedious manual searching to find the files that match each of the criteria. Luckily the find command is capable of locating files with all the above criteria. You just need to know the right flags.
The find command is essential to efficiently locating files on Linux systems. It has several flags that can be used to refine its search. Most importantly for this level are -readable, -size and -executable.
$ find -readable -size 1033c -not -executable
./inhere/maybehere07/.file2
Note -size and -not flags. The c suffix for the -size argument is used to indicate a size in bytes. The other available suffixes are all available in the find man page. Additionally, the -not flag negates the next expression, thus locating any files that aren't executable in this example.
In this case the content and size of the file are sufficient to uniquely identify the file and the -not -executable isn't strictly necessary.
$ find -readable -size 1033c
./inhere/maybehere07/.file2
Once again, cat the file to get the password.
$ cat ./inhere/maybehere07/.file2
[REDACTED PASSWORD]
Level 6
The password for the next level is stored somewhere on the server and has all of the following properties:
- owned by user bandit7
- owned by group bandit6
- 33 bytes in size
This level is very similar to Level 5 with a couple minor differences. First, the file is "stored somewhere on the server" instead of in the inhere directory. That just means we'll need to run the find command from the root of the file system to ensure the file isn't missed. Secondly, the file is specified by two new parameters. The user and group that own the file.
Searching the find manpage you can find the two flags -user and -group to filter for files owned by the bandit7 user and the bandit6 group as specified by the prompt. The final parameter is for a -size of 33 bytes which we already saw in level 5.
Here's an example of the output from find with all the required arguments.
$ find / -user bandit7 -group bandit6 -size 33c
find: ‘/drifter/drifter14_src/axTLS’: Permission denied
find: ‘/root’: Permission denied
find: ‘/snap’: Permission denied
find: ‘/tmp’: Permission denied
find: ‘/proc/tty/driver’: Permission denied
find: ‘/proc/250118/task/250118/fd/6’: No such file or directory
find: ‘/proc/250118/task/250118/fdinfo/6’: No such file or directory
find: ‘/proc/250118/fd/5’: No such file or directory
...
[TRUNCATED OUTPUT]
Unfortunately searching with find from / has a side effect. Any files or directories that the current user is not allowed to read will print an error to the terminal. This makes it pretty difficult to parse the output for any resulting files that match our search. To avoid this flood of errors, a common solution is to redirect the standard error stream to /dev/null This is actually just a file that discards anything written to it.
To redirect a data stream in Bash we must specify its file descriptor, which is an integer. The file descriptor is followed by a greater than sign > which indacates that the stream should be redirected to a target file. Here is the same command as above with all errors redirect to /dev/null.
$ find / -user bandit7 -group bandit6 -size 33c 2>/dev/null
/var/lib/dpkg/info/bandit7.password
As you can see, the output is considerably easier to understand. Read the file at /var/lib/dpkg/info/bandit7.password to get the next password.
Level 7
The password for the next level is stored in the file
data.txtnext to the word "millionth".
Useful commands 2
This is the first level that OverTheWire introduces some new recommended commands since level 0.
| Command | Description |
|---|---|
| man | access the system reference manuals |
| grep | print lines that match patterns |
| sort | sort lines in text files |
| uniq | remove duplicate lines from a file |
| strings | print readable strings from arbitrary files (even binary) |
| base64 | encode data into Base64 |
| tr | translate and replace characters |
| tar | a utility for archive files |
| gzip | a utility for compressing files |
| bzip2 | a utility for compressing files |
| xxd | a tool for creating a hex dump of a file |
Once again, I highly recommend at least reading through the introduction for each of these commands and checking out the examples at cheat.sh.
If you've followed the above advice, there should really only be one contender to solve this level. The grep command.
NAME
   grep - print lines that match patterns

SYNOPSIS
   grep [OPTION...] PATTERNS [FILE...]
   grep [OPTION...] -e PATTERNS ... [FILE...]
   grep [OPTION...] -f PATTERN_FILE ... [FILE...]

DESCRIPTION
   grep  searches for PATTERNS in each FILE. PATTERNS is one or more
   patterns separated by newline characters, and grep prints each line that
   matches a pattern. Typically PATTERNS should be quoted when grep is used in a
   shell command.
According to the syntax description we should be able to search for patterns in a file with the following syntax.
grep <PATTERN> <FILE>
Swapping in the values mentioned in the prompt will return the line we're looking for.
$ grep "millionth" data.txt
millionth       [REDACTED PASSWORD]
Regex
Grep and more generally regular expressions (regex) are extremely useful. You'll find many applications have integrated support for text search via regex. In particular text editors, word processors, and programming IDEs.
To explore regex more I highly recommend reading through the Regex Quick Start Guide from regular-expression.info to get a feel for what's possible with regex and then follow that up with some experimentation on regex101.com. This is a tool that visualizes regex matches. Drop any text you want into it and try out all kinds of search patterns. Try to match words, letters, various combinations of upper and lowercase letters, punctuation, etc. Seeing regex in action and observing precisely what matches with different patterns will give you a much better intuition for what's possible than anything I could write here.
Regex can get very complicated very quickly, so regex101 is also a great tool for debugging your regex. Definitely give it a bookmark, it'll be a life saver. Trust me.
Level 8
The password for the next level is stored in the file
data.txtand is the only line of text that occurs only once
This level is the first that seriously benefits from chaining two commands together. In Bash this is done with the pipe | character. The pipe, when placed after a command will pass all of the output (stdout) into the input (stdin) of the command that follows it.
For example, we can combine the ls and grep commands to list only those files that contain "bash" in the name.
$ ls -a | grep bash
.bash_logout
.bashrc
Remember that the -a flag is necessary to list hidden or dot files.
Read through the Piping and Redirection article provided under the helpful reading material section to learn more about piping.
Reviewing the recommended commands, one should stick out.
NAME
   uniq - report or omit repeated lines

SYNOPSIS
   uniq [OPTION]... [INPUT [OUTPUT]]

DESCRIPTION
   Filter adjacent matching lines from INPUT (or standard input), writing
to OUTPUT (or standard output).

   With no options, matching lines are merged to the first occurrence.
The uniq command is able to filter matching or repeated lines. Since we're looking for a unique line in a file, this will be helpful. However, there is one caveat when using uniq that you must be aware of. The uniq command filters adjacent matching lines. This means that any matching lines that aren't directly adjacent, won't be filtered. So the first step must be to organize the file such that matching lines are adjacent. In other words the file should be sorted. The sort program is designed precisely for this use case.
For example, here's the first 20 lines of data.txt when sorted.
$ sort data.txt | head -n20
0BKVRLEJQcpNx8wnSPxDLFnFKlQafKK6
0BKVRLEJQcpNx8wnSPxDLFnFKlQafKK6
0BKVRLEJQcpNx8wnSPxDLFnFKlQafKK6
0BKVRLEJQcpNx8wnSPxDLFnFKlQafKK6
0BKVRLEJQcpNx8wnSPxDLFnFKlQafKK6
0BKVRLEJQcpNx8wnSPxDLFnFKlQafKK6
0BKVRLEJQcpNx8wnSPxDLFnFKlQafKK6
0BKVRLEJQcpNx8wnSPxDLFnFKlQafKK6
0BKVRLEJQcpNx8wnSPxDLFnFKlQafKK6
0BKVRLEJQcpNx8wnSPxDLFnFKlQafKK6
0eJPctF8gK96ykGBBaKydhJgxSpTlJtz
0eJPctF8gK96ykGBBaKydhJgxSpTlJtz
0eJPctF8gK96ykGBBaKydhJgxSpTlJtz
0eJPctF8gK96ykGBBaKydhJgxSpTlJtz
0eJPctF8gK96ykGBBaKydhJgxSpTlJtz
0eJPctF8gK96ykGBBaKydhJgxSpTlJtz
0eJPctF8gK96ykGBBaKydhJgxSpTlJtz
0eJPctF8gK96ykGBBaKydhJgxSpTlJtz
0eJPctF8gK96ykGBBaKydhJgxSpTlJtz
0eJPctF8gK96ykGBBaKydhJgxSpTlJtz
As mentioned before, the pipe | is useful here to send the output of the sort command to uniq.
$ sort data.txt | uniq | head -n20
0BKVRLEJQcpNx8wnSPxDLFnFKlQafKK6
0eJPctF8gK96ykGBBaKydhJgxSpTlJtz
0kJ7XHD4gVtNSZIpqyP1V45sfz9OBLFo
0lPOvKhpHZebxji0gdjtGCd5GWiZnNBj
0REUhKk0yMqQOwei6NK9ZqIpE5dVlWWM
1jfUH1m4XCjr7eWAeleGdaNSxFXRtX0l
1VKPEkd0bCtIRwMFVQfY7InulwOFyDsn
2u8fvAzvnaFlvQG3iPt4Wc1TFhPcGxhH
35l6mr3f6TvlJyDwU6aUgJX07cLhr6t9
3FIgajXBiaQAiTMVGo1gxRDSiACNyvvJ
3mNA2le0gfURQKNHVIhGkMNLqLwjyyLN
4CKMh1JI91bUIZZPXDqGanal4xvAg0JM
4P8FsHcdr7d5WKnPtAaXY5SslKICd2gL
5EmwMKZHwF6Lwq5jHUaDlfFJBeHbcX0b
5hYz0028e1Q2TrtPVz5GZbpMzZNjebhh
5I2jWpqjtVp576xXI2TLh1UCyXJtGQ78
6Boy6esAjnIxCYn8uI6KZ7VD7zysDM8i
7cP8ssLElERHXqOJc9T84bxsmJBjNXk2
7qHmEo1FEbzthgyNpKc38YofXjYKZv18
8FCtUQlFXsJnNeyiDY5KfE3vRy6sZFEJ
Well that's strange. Why has uniq returned all those lines? If you read the description for uniq carefully, then one line explains this.
With no options, matching lines are merged to the first occurrence.
So essentially what we have here is a file with each unique line of the file where adjacent duplicates have been compressed into a single line. However, we want to list only the unique lines from the input. For that, the -u flag will meet our needs. The -u flag tells sort to only print unique lines. In other words, only lines without any duplicates in the input.
So finally, we have a solution.
$ sort data.txt | uniq -u
[REDACTED PASSWORD]
Level 9
The password for the next level is stored in the file
data.txtin one of the few human-readable strings, preceded by several ‘=’ characters.
Once again we're searching a file, so exploring our options with grep may be a good idea.
Trying a basic grep for several = characters doesn't seem to work.
$ grep '=== \w*' data.txt
grep: data.txt: binary file matches
The \w is a shortcut for any word characters which equivalent to [a-zA-Z0-9_].
We can see here, that grep found some matches, but data.txt was interpreted as a binary file. We can force grep to process the file as if it were text with the -a flag.
$ grep -a '=== \w*' data.txt
D]
h#!QJsVzl7POl%Y]Ha^UvToD|@T^N8g}b}?
Q#gm1x}========== theѦ+idW^)F1>)٘SK3PZt&xs肉WB/2ÜB Ź/Bjɢ<7<u/d|
-n
#iu=
7֣n)Uջش5bBKK}x>}:4Rl_7gHD:274CFy
6!&zB$l_GphqI.02H$Twm⧫o3mt0p~L3JprD========== passwordi L ~ˏ<@Ȅh$%Q5Dk |3
~Tf;o9sP#t+Pe쵟
OqDf.8Czmnf&vl:FXKbM
CIBi>Y
Еk $nXT=~}*4a2?TO"'&J~fDV3========== isd5z(#&s!10&poq
nR F
z|!(if+A64+'FTb5A}
éT:kAU2Qcɐ%#g+;YA_ekrX53|f8+e~&Oiu?VhM}^Qp^G==6!sT: "uVa-t\fg
](.ۍg:7nnp CD`voSQ-<]`@#H UumBiAj堵!O&D9========== [REDACTED PASSWORD]
On the last line of the above output, you'll find the password to the next level.
It's possible for grep to output the precise matching text instead of each entire line. The -o flag is needed to do this. It tells grep to only output the matched pattern.
$ grep -a -o '=== \w*' data.txt
=== the
=== passwordi
=== is
=== [REDACTED PASSWORD]
This gives a much clearer picture of the password without all the surrounding binary data.
Level 10
The password for the next level is stored in the file
data.txt, which contains base64 encoded data
This one is pretty straight forward. The prompt gives it away by mentioning that the data is Base64 encoded.
Check the manual for the base64 command and you'll find one of the first flags is -d for --decode.
$ base64 -d data.txt
The password is [REDACTED PASSWORD]
Be sure you understand what encoding is in this context.
Base64 is just one scheme of many to convert binary data into printable characters i.e. alphanumeric characters with the addition of the equal sign =. In fact, that equal sign = is used for padding the end of encoded text, so it's often a dead giveaway that some text was Base64 encoded. For example, the word "password" when Base64 encoded is cGFzc3dvcmQ=.
Base64 encoded text is extremely common on the web and you're likely to come across it at some point, so it may behoove you to read up on it. FreeCodeCamp has an excellent article that gives a good overview of how Base64 works and what it's used for.
You're less likely see other forms of binary to text encoding, but feel free to read more.
Level 11
The password for the next level is stored in the file data.txt, where all lowercase (a-z) and uppercase (A-Z) letters have been rotated by 13 positions
This challenge is describing what's commonly known as a shift cipher or Caesar cipher. It's not actually used in modern times for any meaningful attempts at securing messages, but it's somewhat popular in CTFs and wargames.
To keep within the spirit of the wargame, let's first go over how you might solve this challenge in the terminal. One of the recommended commands is tr which can "[t]ranslate, squeeze, and/or delete characters" according to the description. Here's a few different ways to go about it.
# Rotate the alphabet by 13 letters where both input and output are explicit
cat data.txt | tr "abcdefghijklmnopqrstuvwxyzABCDEFGHIJKLMNOPQRSTUVWXYZ" "nopqrstuvwxyzabcdefghijklmNOPQRSTUVWXYZABCDEFGHIJKLM"

# Similar to above except the input is defined by a regular expression
cat data.txt | tr "a-zA-Z" "nopqrstuvwxyzabcdefghijklmNOPQRSTUVWXYZABCDEFGHIJKLM"

# Similar to above except both the input and output are defined by a regular expression
# Note: the odd arrangement for the output is the necessary since Regex doesn't allow
# the letter ranges to wrap around
cat data.txt | tr "a-zA-Z" "n-za-mN-ZA-M"
While the tr command is cool and all, there's an even cooler tool you should be using when investigating any challenge related to cryptography. And that's CyberChef. CyberChef has a huge number of useful features for transforming data and supports hundreds of data formats and encoding schemes.
Check out the CyberChef ROT13 cipher solver.
Level 12
The password for the next level is stored in the file
data.txt, which is a hexdump of a file that has been repeatedly compressed. For this level it may be useful to create a directory under/tmpin which you can work. Usemkdirwith a hard to guess directory name. Or better, use the commandmktemp -d. Then copy the datafile usingcp, and rename it usingmv(read the manpages!)
This challenge is quite tedious. As the prompt mentions, it's a good idea to create a temp directory to work with all the files. For example mkdir /tmp/my-super-secret-directory followed by mv ~/data.txt /tmp/my-super-secret-directory. Now we're ready to begin.
The first step is to recognize the format of the data.txt.
Taking a look at the first few lines shows that this file isn't just a text file. It's a hexdump. Read the first few lines with head -n5 data.txt.
00000000: 1f8b 0808 dfcd eb66 0203 6461 7461 322e  .......f..data2.
00000010: 6269 6e00 013e 02c1 fd42 5a68 3931 4159  bin..>...BZh91AY
00000020: 2653 59ca 83b2 c100 0017 7fff dff3 f4a7  &SY.............
00000030: fc9f fefe f2f3 cffe f5ff ffdd bf7e 5bfe  .............~[.
00000040: faff dfbe 97aa 6fff f0de edf7 b001 3b56  ......o.......;V
Don't panic! You don't need to be able to read this stuff right away. Just recognizing it as a hexdump is enough. Fortunately, one of the recommended commands is made specifically to handle hexdumps. The xxd command.
Using xxd with the -r flag can reverse the hexdump into a binary file.
xxd -r data.txt > data
This output data file is now in it's original format and can be examined with file data to determine it's type.
data: gzip compressed data, was "data2.bin", last modified: Thu Sep 19 07:08:15 2024, max compression, from Unix, original size modulo 2^32 574
The result from file identifies it as "gzip compressed data". To decompress the archive, use the gunzip command.
Be aware, that the archive utilities like gunzip may require particular file extensions when decompressing files. For example, .gzip or .gz. Otherwise you may get an error like this.
gzip: data: unknown suffix -- ignored
To complete this challenge, you must repeat this process of decompressing or extracting data into a new format, then verifying the new format with file eight times to reach the original flag file content.
Below is a script describing each step of the decompression. You could run the script directly on the Bandit host to get the flag, but I encourage you to walk through each decompression step manually and observe the different flags being used for each command.
#!/bin/sh
# extract.sh
xxd -r data.txt > f1.gz;    # extract first gzip archive from hexdump
gunzip -c f1.gz > f2.bz2;   # extract bzip2 archive from f1.gz
bunzip2 -c f2.bz2 > f3.gz;  # extract gzip archive from f2.bz2
gunzip -c f3.gz > f4.tar;   # extract tar archive from f3.gz
tar -xOf f4.tar > f5.tar;   # extract tar archive from f4.tar
tar -xOf f5.tar > f6.bz2;   # extract bzip2 archive from f5.tar
bunzip2 -c f6.bz2 > f7.tar; # extract tar archive from f6.bz2
tar -xOf f7.tar > f8.gz;    # extract gzip archive from f7.tar
gunzip -c f8.gz > flag;     # extract plaintext flag file from f8.gz

cat flag;
Level 13
The password for the next level is stored in
/etc/bandit_pass/bandit14and can only be read by userbandit14. For this level, you don’t get the next password, but you get a private SSH key that can be used to log into the next level.Note:
localhostis a hostname that refers to the machine you are working on
Useful commands 3
Once again, OverTheWire has provided some new recommended commands to investigate.
| Command | Description |
|---|---|
| ssh | a program for logging into or executing commands on remote machines |
| telnet | communicate with another host using the TELNET protocol |
| nc | the swiss army knife for communicating over the network using TCP, UDP, or Unix-domain sockets |
| openssl | a program for using various cryptography functions of the OpenSSL crypto library from the shell |
| s_client | a program implementing a generic SSL/TLS client |
| nmap | a network scanner for network exploration and security auditing |
Each program is worth exploring, but for this challenge we'll only need ssh. However, it won't be used quite the same as before. This time an SSH private key is required to login to the next level.
After logging in to bandit13, you should find the private SSH key mentioned in the prompt at /home/bandit13/sshkey.private. Copy that file to your primary host. You can simply copy paste the text if you wish, or use something like scp.
Watch out! The ssh command requires private key files to have appropriate permissions. If they aren't correct you may receive an error message like this.
@@@@@@@@@@@@@@@@@@@@@@@@@@@@@@@@@@@@@@@@@@@@@@@@@@@@@@@@@@@
@         WARNING: UNPROTECTED PRIVATE KEY FILE!          @
@@@@@@@@@@@@@@@@@@@@@@@@@@@@@@@@@@@@@@@@@@@@@@@@@@@@@@@@@@@
Permissions 0644 for 'sshkey.private' are too open.
It is required that your private key files are NOT accessible by others.
This private key will be ignored.
Load key "sshkey.private": bad permissions
A brief reminder of the octal permissions.
| Octal Number | Permission Type | Symbols |
|---|---|---|
| 0 | No permissions | --- |
| 1 | Execute | --x |
| 2 | Write | -w- |
| 3 | Write + Execute | -wx |
| 4 | Read | r-- |
| 5 | Read + Execute | r-x |
| 6 | Read + Write | rw- |
| 7 | Read + Write + Execute | rwx |
As the error mentions, the permissions 0644 are too open. That's because private key files should only be readable and/or writeable by the user they belong to. Usually that means either 600 or 400, though 400 is a bit strict and won't allow the file to edited.
So, setting the permissions to 600 would give the key file read and write access for the user, and no permissions for either the group or others.
chmod 600 sshkey.private
Now we're ready to connect to bandit14.
To use a key file with ssh, the -i flag can be used.
E.g.
ssh user@host -i private_key
To connect to bandi14 use the following command.
ssh bandit14@bandit.labs.overthewire.org -p 2220 -i sshkey.private
SSH is the most common protocol used for remotely administrating Linux and Unix-like systems, and using a key file as we've done here is by far the most common way it's used. It's not strictly necessary, but I highly recommend reading up on the fundamentals of public-key cryptography. It's how SSH guarantees1 it's security.
In the solution above, we just used the -i flag to specify the private key file. However, anyone using ssh on a regular basis will rightly tell you to consider configuring ssh on your system for a much simpler workflow.
If you're connecting to many hosts via ssh, it is much more convenient to configure the ssh-agent to handle your ssh keys automatically so you don't need to specifiy the key file with the -i flag each time.
You may also want to combine this with host-specific configurations. This can be done with a config file usually at ~/.ssh/config. Check out the ssh_config manual for more details.
Level 14
The password for the next level can be retrieved by submitting the password of the current level to port 30000 on localhost.
If you aren't familiar with IP addresses or ports, I highly encourage you to read the recommended reading material on the Bandit 14 page.
This time we need to connect to a particular port, but we won't be using the SSH protocol. Instead we need to send the current password as unencrypted text to port 30000 on localhost. The nc (netcat) utility can do just that.
Netcat establishes a connection with the following syntax:
nc <destination> <port>
- The
destinationcan be any domain as long as it resolves to an IP address, or it can take an IP address directly. - The
portcorresponds to the TCP/UDP port.
Now, connect with the parameters given in the prompt.
netcat localhost 30000
This will establish the connection, but won't provide a new terminal prompt. That's because the program you've connected to is now awaiting input. Provide the level 14 password and press Enter, and the level 15 password will be returned.
Level 15
The password for the next level can be retrieved by submitting the password of the current level to port 30001 on localhost using SSL/TLS encryption.
Helpful note: Getting “DONE”, “RENEGOTIATING” or “KEYUPDATE”? Read the “CONNECTED COMMANDS” section in the manpage.
Now, we've got another challenge asking us to connect to a port on localhost and submit the password, but this time, the password must be encrypted using SSL/TLS.
One of the recommended commands is s_client which is a generic SSL/TLS2 client. We'll need to use a couple flags, -host, and -port.
openssl s_client -host localhost -port 30001
It's actually possible to elide the -host flag since s_client connects to localhost by default.
openssl s_client -port 30001
By default there, will be a fair amount of output describing the security parameters for the connection such as the certificate and handshake details.
Once the connection is established there should be a line at the bottom read R BLOCK. At this point the terminal is awaiting input. Provide the current password to receive the password for the next level.
---
read R BLOCK
[REDACTED BANDIT 15 PASSWORD]
Correct!
[REDACTED BANDIT 16 PASSWORD]

closed
Level 16
The credentials for the next level can be retrieved by submitting the password of the current level to a port on localhost in the range 31000 to 32000. First find out which of these ports have a server listening on them. Then find out which of those speak SSL/TLS and which don’t. There is only 1 server that will give the next credentials, the others will simply send back to you whatever you send to it.
Helpful note: Getting “DONE”, “RENEGOTIATING” or “KEYUPDATE”? Read the “CONNECTED COMMANDS” section in the manpage.
This challenge is almost identical to Level 15. However, this time we are not given the appropriate port. Instead, we're only given a range of suspect ports. To identify the services running on these TCP/UDP ports, we can use the nmap program.
Nmap is a network scanning tool which is often used to automatically enumerate devices and ports in a network. In our case, we're only interested in ports on the Bandit host, or in other words the localhost.
To scan all the ports in the given range on localhost we'll run an nmap command.
nmap localhost -p31000-32000
This should return the following:
Starting Nmap 7.94SVN ( https://nmap.org ) at 2025-05-29 20:28 UTC
Nmap scan report for localhost (127.0.0.1)
Host is up (0.00017s latency).
Not shown: 996 closed tcp ports (conn-refused)
PORT      STATE SERVICE
31046/tcp open  unknown
31518/tcp open  unknown
31691/tcp open  unknown
31790/tcp open  unknown
31960/tcp open  unknown

Nmap done: 1 IP address (1 host up) scanned in 0.18 seconds
This scan results in just a few open ports. Given such a short list, one option is to attempt communication on each port to see which one speaks SSL/TLS. However, if there were many more open ports, it would make more sense to automate that detection with nmap. Luckily this is possible with just one flag -sV which can be found under the SERVICE/VERSION DETECTION section in the manpage.
nmap localhost -p31000-32000
This version of the command will take a bit longer since nmap must analyze the traffic on each open port to determine what service may be running. The output should look something like this.
Starting Nmap 7.94SVN ( https://nmap.org ) at 2025-05-29 21:11 UTC
Nmap scan report for localhost (127.0.0.1)
Host is up (0.00018s latency).
Not shown: 996 closed tcp ports (conn-refused)
PORT      STATE SERVICE     VERSION
31046/tcp open  echo
31518/tcp open  ssl/echo
31691/tcp open  echo
31790/tcp open  ssl/unknown
31960/tcp open  echo
1 service unrecognized despite returning data. If you know the service/version, please submit the following fingerprint at https://nmap.org/cgi-bin/submit.cgi?new-service :
SF-Port31790-TCP:V=7.94SVN%T=SSL%I=7%D=5/29%Time=6838CD8E%P=x86_64-pc-linu
SF:x-gnu%r(GenericLines,32,"Wrong!\x20Please\x20enter\x20the\x20correct\x2
SF:0current\x20password\.\n")%r(GetRequest,32,"Wrong!\x20Please\x20enter\x
SF:20the\x20correct\x20current\x20password\.\n")%r(HTTPOptions,32,"Wrong!\
SF:x20Please\x20enter\x20the\x20correct\x20current\x20password\.\n")%r(RTS
SF:PRequest,32,"Wrong!\x20Please\x20enter\x20the\x20correct\x20current\x20
SF:password\.\n")%r(Help,32,"Wrong!\x20Please\x20enter\x20the\x20correct\x
SF:20current\x20password\.\n")%r(FourOhFourRequest,32,"Wrong!\x20Please\x2
SF:0enter\x20the\x20correct\x20current\x20password\.\n")%r(LPDString,32,"W
SF:rong!\x20Please\x20enter\x20the\x20correct\x20current\x20password\.\n")
SF:%r(SIPOptions,32,"Wrong!\x20Please\x20enter\x20the\x20correct\x20curren
SF:t\x20password\.\n");

Service detection performed. Please report any incorrect results at https://nmap.org/submit/ .
Nmap done: 1 IP address (1 host up) scanned in 155.35 seconds
Here we have the same open ports as before, but this time, with some additional version information. You'll notice that SSL/TLS responses were only detected on ports 31518 with ssl/echo and 31790 with ssl/unknown. The ssl/echo is just a simple echo service like the others, except that it is served via SSL/TLS, which only leaves the remaining ssl/unknown service. You can actually see the initial text sent and received by nmap when analyzing port 31790. It seems to include several failed password attempts.
Just as in Level 15, we can use the following OpenSSL command to start an SSL/TLS connection with our target port.
After the initial connection is established, the program awaits some user input which requires the password to the current level.
Once the password is entered, it's possible that the service does not immediately reply with the credentials for the next level. As mentioned in the prompt, if there is a response including "DONE", "RENEGOTIATING", or "KEYUPDATE" then you may need to check the "CONNECTED COMMANDS" section of the openssl-s_client manpage.
CONNECTED COMMANDS (BASIC)
       If  a connection is established with an SSL/TLS server then any data received from the server
       is displayed and any key presses will be sent to the server. If end of file is  reached  then
       the connection will be closed down.

       When  used  interactively  (which  means  neither  -quiet  nor -ign_eof have been given), and
       neither of -adv or -nocommands are given then "Basic" command mode is entered. In  this  mode
       certain commands are recognized which perform special operations. These commands are a letter
       which  must  appear  at the start of a line. All further data after the initial letter on the
       line is ignored.  The commands are listed below.

       Q   End the current SSL connection and exit.

       R   Renegotiate the SSL session (TLSv1.2 and below only).

       C   Attempt to reconnect to the server using a resumption handshake.

       k   Send a key update message to the server (TLSv1.3 only)

       K   Send a key update message to the server and request one back (TLSv1.3 only)
In my case, I received a "KEYUPDATE" response because the password I used begins with a "k".
--- snip ---
read R BLOCK
[REDACTED LEVEL 15 PASSWORD]
KEYUPDATE
Since I didn't provide any of the -quiet, -ign_eof, -adv, or -nocommands flags, the connection entered the "Basic" command mode which uses the first character in the next line of input to determine which command to execute.
To prevent this "Basic" mode from clobbering our input we need use one of these flags. For example.
openssl s_client -connect localhost:31790 -nocommands
Which should return the following.
--- snip ---
read R BLOCK
[REDACTED LEVEL 16 PASSWORD]
Correct!
-----BEGIN RSA PRIVATE KEY-----
[REDACTED RSA KEY]
-----END RSA PRIVATE KEY-----

closed
This time, the service accepts the password and replies with an RSA key to access the next level and closes the connection.
Level 17
There are 2 files in the homedirectory:
passwords.oldandpasswords.new. The password for the next level is inpasswords.newand is the only line that has been changed betweenpasswords.oldandpasswords.newNOTE: if you have solved this level and see ‘Byebye!’ when trying to log into bandit18, this is related to the next level, bandit19
This level wants us to find any differences between the passwords.old and passwords.new files. One of the recommended commands is diff which has the sole purpose of comparing files line by line and displaying the differences.
Let's get a diff of our two password files.
$ diff passwords.old passwords.new
42c42
< C6XNBdYOkgt5ARXESMKWWOUwBeaIQZ0Y
---
> [REDACTED LEVEL 18 PASSWORD]
The first line indicates which lines were changed. In this case a change has been identified in line 42 of both files. The lines above the --- separator are the changes made in the file that was input as the first argument (passwords.old), while the lines under the --- correspond to the second argument (password.new).
We can see the password for level 18 highlighted in green.
Level 18
The password for the next level is stored in a file
readmein the homedirectory. Unfortunately, someone has modified.bashrcto log you out when you log in with SSH.
While ssh is primarily used for starting a user shell on a remote host, commands can actually be executed directly without starting a new shell. The SYNOPSIS of the ssh manpage shows the necessary syntax.
SYNOPSIS
       ssh   [-46AaCfGgKkMNnqsTtVvXxYy]  [-B  bind_interface]  [-b  bind_address]  [-c  cipher_spec]
           [-D [bind_address:]port] [-E log_file]  [-e  escape_char]  [-F  configfile]  [-I  pkcs11]
           [-i   identity_file]   [-J  destination]  [-L  address]  [-l  login_name]  [-m  mac_spec]
           [-O ctl_cmd] [-o option] [-P tag] [-p port] [-R address]  [-S  ctl_path]  [-W  host:port]
           [-w local_tun[:remote_tun]] destination [command [argument ...]]
       ssh [-Q query_option]
After the required destination parameter you can see the optional [command [argument ...]] parameter. Any commands provided here will be executed on the remote host.
So the command to output the password in the remote host's readme file should look like this.
$ ssh bandit18@bandit.labs.overthewire.org cat readme
                         _                     _ _ _
                        | |__   __ _ _ __   __| (_) |_
                        | '_ \ / _` | '_ \ / _` | | __|
                        | |_) | (_| | | | | (_| | | |_
                        |_.__/ \__,_|_| |_|\__,_|_|\__|


                      This is an OverTheWire game server.
            More information on http://www.overthewire.org/wargames

bandit18@bandit.labs.overthewire.org's password:
[REDACTED LEVEL 18 PASSWORD]
This command should be executed from your own system, not from the system hosting Bandit i.e. while logged into one of the previous levels.
I've configured my SSH client to automatically use port 2220 as required for the Bandit wargame which is why I haven't explicitly provided the port in this example. To do the same, add the following line to your ~/.ssh/config file or provide the port number via the -p flag.
Host bandit.labs.overthewire.org
    port 2220
Level 19
To gain access to the next level, you should use the
setuidbinary in the homedirectory. Execute it without arguments to find out how to use it. The password for this level can be found in the usual place (/etc/bandit_pass), after you have used thesetuidbinary.
First let's define a few terms.
| Term | Descriptions |
|---|---|
| Real User ID (RUID) | The ID of the user which started a process |
| Effective User ID (EUID) | The ID of the user which defines the privileges of a running process. |
| suid permission bit | A special file permission bit besides the standard read (r), write (w), and execute (x) that allows a file to be executed as the owner of that file |
For the bandit20-do permissions the suid bit can be seen as the s in the execute position of the user permissions.
$ ls -l
total 16
-rwsr-x--- 1 bandit20 bandit19 14884 Apr 10 14:23 bandit20-do
The special (suid) permission is set and the owner of the file is bandit20, thus allowing the binary access to resources available to the user bandit20.
By default, the effective user ID matches the real user ID. However, If you execute the provided binary without any arguments some usage information will be returned.
$ ./bandit20-do
Run a command as another user.
  Example: ./bandit20-do id
Note that the id command will show the real and effective user and group IDs for the current user's shell unless provided with an argument. Now, let's run that example.
$ ./bandit20-do id
uid=11019(bandit19) gid=11019(bandit19) euid=11020(bandit20) groups=11019(bandit19)
See how it differs from running the plain id command run as the bandit19 user.
$ id
uid=11019(bandit19) gid=11019(bandit19) groups=11019(bandit19)
An additional item is returned from the bandit20-do invocation, the effective user ID euid=11020(bandit20). This indicates that the commands run via bandit20-d0 should be able to access files available to the bandit20 user. Which includes the password file.
As long as we know its location which was provided as /etc/bandit_pass/bandit20 we can simply output the file. So, solving this challenge is actually quite simple. Execute a cat command with the password file as an argument via the bandit20-do binary like so:
$ ./bandit20-do cat /etc/bandit_pass/bandit20
[REDACTED BANDIT 20 PASSWORD]
Level 20
There is a setuid binary in the homedirectory that does the following: it makes a connection to localhost on the port you specify as a commandline argument. It then reads a line of text from the connection and compares it to the password in the previous level (bandit20). If the password is correct, it will transmit the password for the next level (bandit21).
NOTE: Try connecting to your own network daemon to see if it works as you think
Useful commands 4
This challenge recommends some new commands that we haven't seen so far.
| Command | Description |
|---|---|
| screen | a terminal multiplexer |
| tmux | a terminal multiplexer |
| jobs | display the status of all jobs in the current session |
| bg | send a running job to the background |
| fg | bring a backgrounded job to the foreground |
These programs introduce some new concepts that are pretty important for anyone working on Linux system whether as a user or an administrator. Let's briefly go over them.
Job control
You can read more about it in the Job Control section of the Bash Reference Manual. But, to summarize, job control, is a system for suspending and resuming processes and allowing them to run in the background such that the user can continue executing other commands without waiting for previous commands to complete.
To interact with the job control system, we have a few tools including: the jobs, bg, and fg commands as well as the & character, and the Ctrl+Z keyboard shortcut which you may see referred to as the suspend character or ^Z.
We generally use two methods to run a program in the background. The first is to execute a command with an & at the end of the line.
For example
$ cat - &
[1] 1809443
The cat process has been added to the jobs list and is now in the background.
$ jobs
[1]+  Stopped                 cat -
As you can see when listing the available jobs, the command has been Stopped which indicates that is has been suspended and is no longer running. However, we can bring this process back to the foreground so that we can interact with it again using the fg command.
$ fg
cat -
hello
hello
Besides starting a command with the &, we can also use the Ctrl+Z keyboard shortcut to send an already running process to the background. Let's send the cat process to the background once again.
^Z
[1]+  Stopped                 cat -
$ jobs
[1]+  Stopped                 cat -
You can see here we've once again stopped the process running cat and returned it to the background. The ^Z indicates the pressing of Ctrl+Z. Be aware though, that backgrounding a process in this manner will also stop the process. To let it continue running in that background you must use the bg command.
$ bg %1
[1]+ cat - &

[1]+  Stopped                 cat -
Here we used what's known as a job specification or job spec to identify the job with a % followed by the ID of 1 which you may need to do if you have several backgrounded jobs. In this little example, since the cat process is awaiting user input, it's immediately stopped again after telling it to run in the background. However, a longer running process would continue until the program exits or is awaiting more user input.
Terminal multiplexing
Both tmux and screen are terminal multiplexers. Which just means they can display multiple terminals within a single window. They allow you to split these windows as needed and can allow grouping terminals, copying and pasting etc. This can all be done from the command line with these tool, which is why they're useful when working over a remote SSH session.
There are also GUI-based alternatives. Terminal emulators like Terminator, Konsole, and even Windows Terminal ship with multiplexing features, but I won't go into too much detail here. I recommend you try out whichever ones work for your system and see what you like best. Just know that only the terminal-based multiplexers like tmux and screen will enable you to use multiple terminals on a remote system without initiating an additional SSH session.
Solution
This challenge provides another setuid binary, just how Level 19 did. Checking the permissions shows that this binary also has the suid bit set with an owner of bandit21, so it should be able to read the bandit21 password file for us in some way.
$ ls -l
total 16
-rwsr-x--- 1 bandit21 bandit20 15608 Apr 10 14:23 suconnect
First off, let's check the usage information for suconnect.
$ ./suconnect
Usage: ./suconnect <portnumber>
This program will connect to the given port on localhost using TCP. If it receives the correct password from the other side, the next password is transmitted back.
For this walkthrough we'll use the job control method.
First, we need to setup a TCP listener on a high port3 for the suconnect binary to connect to. The simplest way to do this is with the netcat utility which we've used before.
Here we run netcat in listening mode and specify port 9898, but importantly we've provided the & at the end of the line to send the process to the background.
$ nc -l -p 9898 &
[1] 744373
Running the jobs command will list the active jobs which now includes the netcat command we just launched. As you can see it's still running since it's awaiting a connection.
$ jobs
[1]+  Running                 nc -l -p 9898 &
Next we need to run the suconnect binary and connect to the same port, 9898. We also execute this command as a background job.
$ ./suconnect 9898 &
[2] 913657
The jobs list now contains both of our programs running in the background.
$ jobs
[1]+  Stopped                 nc -l -p 9898
[2]-  Running                 ./suconnect 9898 &
You can see that the netcat command has been stopped, but we can start it again by bringing it into the foreground with the fg command to interact with it. Note that since the netcat job has the + indicator it will be selected by default, but we can also specify the specific job to bring to the foreground with it's job number.
Once you bring the netcat job to the foreground, the terminal will once again be awaiting input. Provide the level 20 password as the prompt informed us.
$ fg %1
nc -l -p 9898
[REDACTED LEVEL 20 PASSWORD]
Read: [REDACTED LEVEL 20 PASSWORD]
Password matches, sending next password
[REDACTED LEVEL 21 Password]
[2]+  Done                    ./suconnect 9898
As you can see, suconnect accepted the level 20 password and replied with the password for level 21. We can also see that the job for suconnect completed and exited normally by the Done response in the final line.
Level 21
A program is running automatically at regular intervals from cron, the time-based job scheduler. Look in /etc/cron.d/ for the configuration and see what command is being executed.
The prompt also recommends some useful manpages.
Cron
| Manpage | Description |
|---|---|
| cron(8) | system for scheduling commands |
| crontab(1) | manage crontab files for a user |
| crontab(5) | crontab file format and syntax |
Cron is a system for executing commands at regular intervals. This is a very common task for system administrators. Whether a task involves performing regular backups of data or generate reports automatically.
Contab guru is a convenient tool to parse crontabs if you're unfamiliar with the syntax or want to verify the correctness of your own crontabs.
Solution
The prompt points us to the configuration files in /etc/cron.d.
$ ls -l
total 28
-rw-r--r-- 1 root root 123 Apr 10 14:16 clean_tmp
-rw-r--r-- 1 root root 120 Apr 10 14:23 cronjob_bandit22
-rw-r--r-- 1 root root 122 Apr 10 14:23 cronjob_bandit23
-rw-r--r-- 1 root root 120 Apr 10 14:23 cronjob_bandit24
-rw-r--r-- 1 root root 201 Apr  8  2024 e2scrub_all
-rwx------ 1 root root  52 Apr 10 14:24 otw-tmp-dir
-rw-r--r-- 1 root root 396 Jan  9  2024 sysstat
Checking the contents of the cronjob_bandit22 file reveals a specification for two cron jobs.
@reboot bandit22 /usr/bin/cronjob_bandit22.sh &> /dev/null
* * * * * bandit22 /usr/bin/cronjob_bandit22.sh &> /dev/null
The first line runs the cronjob_bandit22.sh script at boot time, and the second line runs the same script every minute.
Let's see what that script does.
#!/bin/bash
chmod 644 /tmp/t7O6lds9S0RqQh9aMcz6ShpAoZKF7fgv
cat /etc/bandit_pass/bandit22 > /tmp/t7O6lds9S0RqQh9aMcz6ShpAoZKF7fgv
According to this script, the password for bandit22 seems to be written to the file /tmp/t7O6lds9S0RqQh9aMcz6ShpAoZKF7fgv. Reading that file will reveal the password.
$ cat /tmp/t7O6lds9S0RqQh9aMcz6ShpAoZKF7fgv
[REDACTED LEVEL 22 PASSWORD]
Level 22
A program is running automatically at regular intervals from cron, the time-based job scheduler. Look in
/etc/cron.d/for the configuration and see what command is being executed.NOTE: Looking at shell scripts written by other people is a very useful skill. The script for this level is intentionally made easy to read. If you are having problems understanding what it does, try executing it to see the debug information it prints.
This level once again involves Cron. You may remember, from Level 21 that there were a few other cron files in /etc/cron.d.
This time we're interested in the /etc/cron.d/cronjob_bandit22 file.
@reboot bandit23 /usr/bin/cronjob_bandit23.sh  &> /dev/null
* * * * * bandit23 /usr/bin/cronjob_bandit23.sh  &> /dev/null
Once again this crontab points to a script in /usr/bin.
1 #!/bin/bash
2 myname=$(whoami)
3 mytarget=$(echo I am user $myname | md5sum | cut -d ' ' -f 1)
4
5 echo "Copying passwordfile /etc/bandit_pass/$myname to /tmp/$mytarget"
6
7 cat /etc/bandit_pass/$myname > /tmp/$mytarget
This script is quite similar to the script in Level 21 except it's now using a variable, mytarget to store the target directory. And, instead of using a hardcoded location, the mytarget is built with a series of commands.
However, be aware that the $myname variable is being populated when the script runs as the bandit23 user. So you can't use the results of whoami in the current shell for the $myname variable since that resolves to bandit22. Instead, the $myname variable should be bandit23. Replace it in the command line, like so, to calculate the correct location for the password.
echo I am user bandit23 | md5sum | cut -d ' ' -f 1
Running this series of commands will give us the value stored in $mytarget which is 8ca319486bfbbc3663ea0fbe81326349. Therefore, the final location for the password is /tmp/8ca319486bfbbc3663ea0fbe81326349. Output the file to get the password.
$ cat /tmp/8ca319486bfbbc3663ea0fbe81326349
[REDACTED BANDIT 23 PASSWORD]
Level 23
A program is running automatically at regular intervals from cron, the time-based job scheduler. Look in
/etc/cron.d/for the configuration and see what command is being executed.NOTE: This level requires you to create your own first shell-script. This is a very big step and you should be proud of yourself when you beat this level!
NOTE 2: Keep in mind that your shell script is removed once executed, so you may want to keep a copy around…
This challenge is similar to the last one, but this time we won't just be reading a shell script. We'll be writing out own.
Shell scripting
We mostly breezed by all the scripts in the previous levels, but now that we're writing our own. Let's break them down a bit.
First we'll look at the anatomy of a shell script. Shell scripts are just text files. On Linux, file extensions in Linux usually4 aren't necessary, but it's common to end shell scripts with a .sh e.g. shell.sh.
The first line of any script should include a shebang to specify what kind of script it is. When a file starting with a shebang is executed, the filepath provided after the shebang points the interpreter that will be used for the script.
For example, a shell script might begin like so.
#!/bin/bash
echo Hello there!
But it's also possible to indicate other types of scripts, like Python for example.
#!/usr/bin/python
print("Hi!")
We'll only be writing shell scripts in this walkthrough though.
After the shebang, you can write any command as you'd normally write directly in the terminal. For example, here's a script making a directory and writing some text to a file in that directory.
#!/bin/sh
mkdir -p test_dir
echo "TESTING" > test_dir/test.txt
cat test_dir/test.txt
There's a lot more to Bash and shell scripting, but this should be enough to get started. If you'd like to learn more, the Bash Reference Manual is an excellent reference.
If you're planning to do any real work with Bash scripts, definitely read through the Bash scripting quirks & safety tips article by Julia Evans. It'll walk you through some of the common gotchas.
Don't forget to make any script you write executable. On most systems files aren't created with the execute (x) permission. So you'll need to modify the permissions with a command like chmod +x. This will enable any user to execute the script.
Solution
Now let's write our script.
We know that bandit24 has a cronjob running. You'll find it at /etc/cron.d/cronjob_bandit24.
@reboot bandit24 /usr/bin/cronjob_bandit24.sh  &> /dev/null
* * * * * bandit24 /usr/bin/cronjob_bandit24.sh  &> /dev/null
Just like the last level, the cronjob is executing a script in /usr/bin. Let's examine it.
1 #!/bin/bash
2
3 myname=$(whoami)
4
5 cd /var/spool/$myname/foo
6 echo "Executing and deleting all scripts in /var/spool/$myname/foo:"
7 for i in * .*;
8 do
9 if [ "$i" != "." -a "$i" != ".." ];
10 then
11 echo "Handling $i"
12 owner="$(stat --format "%U" ./$i)"
13 if [ "${owner}" = "bandit23" ]; then
14 timeout -s 9 60 ./$i
15 fi
16 rm -f ./$i
17 fi
18 done
According to the echo message, this script should be executing and deleting all the scripts in /var/spool/bandit24/foo.
So, presumably, if that foo directory is writable by bandit23 then we could write a script. Copy it into that directory, and then simply wait for the cronjob to activate and run our script. Let's check.
$ ls -l /var/spool/bandit24/
total 4
drwxrwx-wx 62 root bandit24 4096 Jun 17 13:51 foo
Note the atypical w in the "other" portion of the directory permissions. That means we'll be able to copy in any scripts we'd like.
There are plenty of different ways you could solve this, but the simplest is to send the contents of the bandit24 password file to a new file which we can read. Here's an example solution.
1 #!/bin/sh
2 mkdir -p /tmp/cblanken_L24
3 cat /etc/bandit_pass/bandit24 > /tmp/cblanken_L24/pass.txt
Don't forget to swap in your own temporary directory name and make your script file executable with chmod.
$ chmod +x solve.sh
Then copy your script into /var/spool/bandit24/foo and wait for it to be executed.
$ cp solve.sh /var/spool/bandit24/foo/
The cronjob is triggered every minute, so you shouldn't have to wait long.
$ cat /tmp/cblanken_L24/pass.txt
[REDACTED LEVEL 24 PASSWSORD]
Level 24
A daemon is listening on port 30002 and will give you the password for bandit25 if given the password for bandit24 and a secret numeric 4-digit pincode. There is no way to retrieve the pincode except by going through all of the 10000 combinations, called brute-forcing. You do not need to create new connections each time
There are a lot of possible ways to solve this, but I recommend splitting it into two parts.
- First we need to generate these 4 digit PINs
- Then we'll send them to port 30002.
Generating PINs
One convenient way to do this is with the seq command which can generate sequences of numbers.
For example
$ seq 0 10
0
1
2
3
4
5
6
7
8
9
10
You might notice though that all these single digits aren't exactly valid PINs. They should have leading zeroes up to 4 digits.
Fortunately, seq has a flag that will pad our numbers with leading zeroes just how we need using the -w flag. Here's an excerpt from the manual.
-w, --equal-width
   equalize width by padding with leading zeroes
Now we have our leading zeroes, and we just need to update the maximum argument from 10 to 9999 to get every possible 4-digit pin.
$ seq -w 0 9999
0000
0001
0002
0003
0004
--- snip ---
9995
9996
9997
9998
9999
Next let's see what we need to be sending to port 30002. If you start a connection to the port with netcat, the service will reply with a simple explanation.
$ nc localhost 30002
I am the pincode checker for user bandit25. Please enter the password for user bandit24 and the secret pincode on a single line, separated by a space.
It says here that the bandit24 password and our PIN should be sent in a single line with a space separating the two. To write this all out, it would be a bit unwieldy to do it all directly from the shell, so let's write ourselves a Bash script.
We've already gone over some of the basics, but here we'll need to introduce some new syntax. The for loop.
#!/bin/bash

# Generate PINs
for i in $(seq -w 0 9999); do
   echo "[REDACTED LEVEL 24 PASSWORD] $i"
done
Now, I want to return to something mentioned in the prompt. It reads.
You do not need to create new connections each time.
This is actually quite an important concept when writing scripts or doing any programming really. Understanding the requirements for the script you're writing and making it perform well without doing extra work or using resources that aren't strictly necessary. In this case the prompt has hinted to us that we really only need one connection to port 30002 to do all this work.
Now I want you to think about what this script will do with the addition of one line. Consider why this might be problematic.
for i in $(seq -w 0 9999); do
   echo "[REDACTED LEVEL 24 PASSWORD] $i" | nc localhost 30002
done
The problem here is that we've placed our call to netcat within our for loop. That means netcat will be creating and tearing down the connection to port 30002 for every iteration of this loop. If you try this script you'll also notice an even more glaring problem. The program actually hangs after sending only the first code. That's because netcat will await user input as long as the connection hasn't been closed and since the correct PIN wasn't sent, the service is still awaiting more input.
So we can already see this approach may cause some problems. Instead, let's generate all our numbers with our first script and then pass the output to netcat with a pipe. In this way, only one connection is required, and we can guarantee that all the PINs will be sent to the service on port 30002.
$ ./gen_pincodes.sh | nc localhost 30002
Running the script will yield the password once the correct PIN is reached.
--- snip ---
Wrong! Please enter the correct current password and pincode. Try again.
Wrong! Please enter the correct current password and pincode. Try again.
Wrong! Please enter the correct current password and pincode. Try again.
Wrong! Please enter the correct current password and pincode. Try again.
Correct!
The password of user bandit25 is [REDACTED LEVEL 25 PASSWORD]
Level 25
Logging in to bandit26 from bandit25 should be fairly easy… The shell for user bandit26 is not
/bin/bash, but something else. Find out what it is, how it works and how to break out of it.NOTE: if you’re a Windows user and typically use Powershell to ssh into bandit: Powershell is known to cause issues with the intended solution to this level. You should use command prompt instead.
We're told bandit 26 runs some other shell than bash.
There are a couple ways to discover a user's default shell in Linux. One is the /etc/passwd file. It lists all the users of the system, whether they can login, and what default shell they have. We can cat /etc/passwd and search for bandit26 to discover its shell. Here's the relevant excerpt.
$ cat /etc/passwd
--- snip ---
bandit24:x:11024:11024:bandit level 24:/home/bandit24:/bin/bash
bandit25:x:11025:11025:bandit level 25:/home/bandit25:/bin/bash
bandit26:x:11026:11026:bandit level 26:/home/bandit26:/usr/bin/showtext
bandit27:x:11027:11027:bandit level 27:/home/bandit27:/bin/bash
bandit28:x:11028:11028:bandit level 28:/home/bandit28:/bin/bash
--- snip ---
To display this information in a more readable format, we can use the lslogins command as well.
$ lslogins bandit26
Username:                           bandit26
UID:                                11026
Gecos field:                        bandit level 26
Home directory:                     /home/bandit26
Shell:                              /usr/bin/showtext
No login:                           no
Primary group:                      bandit26
GID:                                11026
Last login:                         14:03
Last terminal:                      pts/171
Last hostname:                      183.171.69.129
Hushed:                             no
Running processes:                  0

Last logs:
Note how the Shell field for bandit26 is /usr/bin/showtext as opposed to the other levels which use /usr/bin/bash as the default shell.
Running file on /usr/bin/showtext shows that it's a regular ASCII file.
$ file /usr/bin/showtext
/usr/bin/showtext: POSIX shell script, ASCII text executable
It's identified as a shell script, so let's read through it to see what it's doing.
1 #!/bin/sh
2
3 export TERM=linux
4
5 exec more ~/text.txt
6 exit 0
Pretty short, it seems to be setting the $TERM shell variable to "linux" and then replaces the current shell with a more command with the file /home/bandit26/text.txt (remember the ~ will expand to the home directory of the user). We can't directly read the contents of the text.txt file from bandit25 but since the more pager is being used it should print the contents to the screen when we try to login as the bandit26 user.
Pagers
Before we continue though, we need to discuss a bit about pagers.
You might have already used one before, but this is our first look at a challenge that strictly requires the use of one. The pager used here is more, but it's more likely you'll have used less which is the default in many Linux distributions.
Essentially pagers allow us to view text in the terminal such that it's paginated. As opposed to printing an entire file with the cat command all in one shot. A pager like more will stop writing text once the screen is filled and then allow you to continue page by page until you've reached the end of the text. The less command has some more advanced text search features and allows moving forward and backwards through a file unlike more.
In any case, I'd recommend looking through the help menu of less (just press h after opening a file to see a summary of less commands).
1 SUMMARY OF LESS COMMANDS
2
3 Commands marked with * may be preceded by a number, N.
4 Notes in parentheses indicate the behavior if N is given.
5 A key preceded by a caret indicates the Ctrl key; thus ^K is ctrl-K.
6
7 h H Display this help.
8 q :q Q :Q ZZ Exit.
9 ---------------------------------------------------------------------------
10
11 MOVING
12
13 e ^E j ^N CR * Forward one line (or N lines).
14 y ^Y k ^K ^P * Backward one line (or N lines).
15 f ^F ^V SPACE * Forward one window (or N lines).
16 b ^B ESC-v * Backward one window (or N lines).
17 z * Forward one window (and set window to N).
18 w * Backward one window (and set window to N).
19 ESC-SPACE * Forward one window, but don't stop at end-of-file.
20 d ^D * Forward one half-window (and set half-window to N).
21 u ^U * Backward one half-window (and set half-window to N).
22 ESC-) RightArrow * Right one half screen width (or N positions).
23 ESC-( LeftArrow * Left one half screen width (or N positions).
24 ESC-} ^RightArrow Right to last column displayed.
25 ESC-{ ^LeftArrow Left to first column.
26 F Forward forever; like "tail -f".
27 HELP -- Press RETURN for more, or q when done
Now back to the challenge at hand.
Solution
Bandit 25 has an ssh key for bandit 26 in the home directory. We'll retrieve that first so we can ssh directly into bandit 26. But, if you try to login with this key we're greeted with the usual message followed by a closed connection.
$ ssh bandit26@bandit.labs.overthewire.org -i bandit26.key
--- snip ---
--[ More information ]--

  For more information regarding individual wargames, visit
  http://www.overthewire.org/wargames/

  For support, questions or comments, contact us on discord or IRC.

  Enjoy your stay!

  _                     _ _ _   ___   __
 | |                   | (_) | |__ \ / /
 | |__   __ _ _ __   __| |_| |_   ) / /_
 | '_ \ / _` | '_ \ / _` | | __| / / '_ \
 | |_) | (_| | | | | (_| | | |_ / /| (_) |
 |_.__/ \__,_|_| |_|\__,_|_|\__|____\___/
Connection to bandit.labs.overthewire.org closed.
The crux of this challenge relies on that fact that the paging of more is dependent upon the size of the text input. If the number of lines of text exceed the available lines on-screen then more will paginate the output, otherwise it behaves like the cat command. So, in the case above, my terminal was able to print the entire text.txt file which we can probably assume contains the ASCII art of bandit26 since that's the last thing we see and the only thing that deviates from the normal welcome message from previous levels.
So, that means it should be possible to trigger the pager by shrinking the height of our terminal to less than 6 lines high.

Since the output is paginated, the connection doesn't immediately end because the more program is waiting for us to page through the remaining content. However, more has some other features that can help us escape this prompt. If you press either the h or ? key while on this prompt, more will list out a summary of commands. One of which includes the option to execute commands in a subshell. 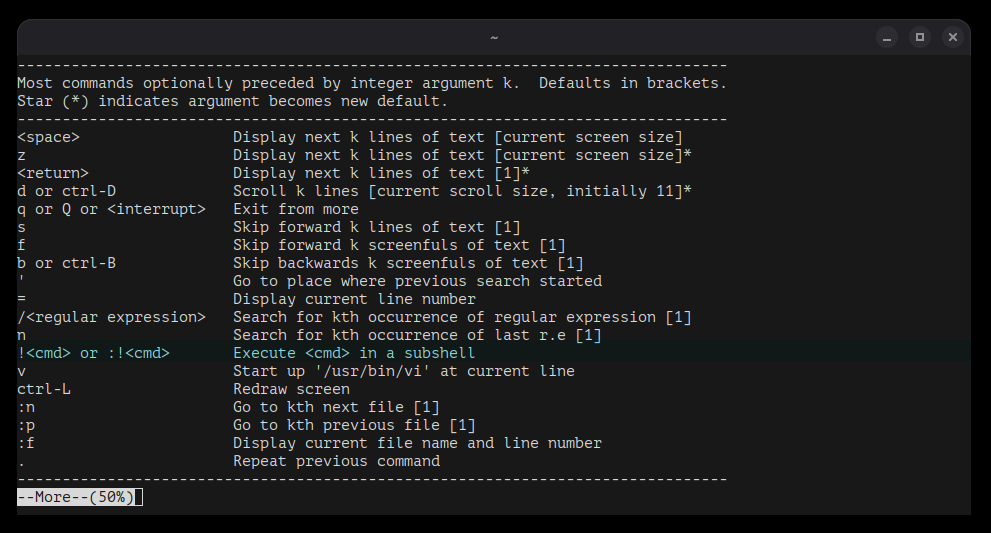
This is promising and there may be a way to execute commands directly via more to retrieve the bandit26 password and to solve for the next one. However, it's quite laborious since more won't yield any output for any commands we run, so we would have to write to various temporary files to manage it.
Instead, I'm going to show you a neat trick with Vi. If you look carefully there's an option just below the !<cmd> option. The v command which will open vi.
Vi and Vim
Vi is a powerful text editor that is a common default on Linux systems. You may have also heard of its descendant Vim which has even more capabilities.
I won't be going into much detail on the features of Vim here. Just enough to demonstrate the solution, but I highly recommend working through the beginner section of the Vim Guide by The Valuable Dev if you're interested in discovering its power.
From here on out I'll refer to Vi and Vim collectively as Vim for simplicity. Just be aware they are in fact distinct. Even if we don't run into any distinguishing features in this walkthrough.
Firstly, Vim is not a typical text editor like most folks are familiar with like Windows' Notepad and Apple's TextEdit. Vim exists entirely in the terminal and was designed to function entirely without a pointing device like a mouse. Vim is what's known as a modal editor. Instead of always interpreting input from the keyboard as text to be written, Vim has several different modes:
- normal mode (this is the default mode usually used for navigating your files)
- insert mode (this is like your typical text editors)
- visual mode (kind of like when you select text with your mouse in other editors)
- command mode
The main thing you need to know for this challenge is that the colon : is used to enter command mode.
The first command we'll use is :edit. This command will open a file so let's use it to grab the bandit26 password.
:edit /etc/bandit_pass/bandit26
[REDACTED BANDIT 26 PASSWORD]
~
~
~
~
~
"/etc/bandit_pass/bandit26" [readonly] 1L, 33B           1,1           All
While this is a good first step, we still need some way access a shell to complete the next level.
Fortunately Vim can also open a shell with the :shell command. You can read more about it with the :help command. The full command is :help :shell.
Unfortunately, by default, it uses the same shell that spawned the process. Use the set command to change the mentioned shell variable like so.
:set shell=/bin/bash
At last, we can open a bash shell with the :shell command.

Level 26
Good job getting a shell! Now hurry and grab the password for bandit27!
- If we look in the home directory of bandit27 we'll find a setuid script called
bandit27-do. When we run it we get the following output.
This level is essentially a duplicate of Level 19 since the real difficulty is in gaining a shell via more as shown in Level 25.
The suid binary bandit27-do is available in the home directory.
$ ./bandit27-do
Run a command as another user.
  Example: ./bandit27-do id
Print the bandit27 password like so.
$ ./bandit27-do cat /etc/bandit_pass/bandit27
[REDACTED BANDIT 27 PASSWORD]
Level 27
There is a git repository at
ssh://bandit27-git@localhost/home/bandit27-git/repo via the port 2220. The password for the user bandit27-git is the same as for the userbandit27.Clone the repository and find the password for the next level.
Git
Git is a software version control system. As of this writing Git is probably the most popular version control system for software and has been for a while. At any rate, you'll likely come across it while doing any kind of IT administration or security work.
The best resource to learn about Git is probably the reference documentation and the Pro Git book which is freely available online, but it isn't necessary to know a lot of details for these challenges.
To start you really only need to know a few commands.
| Git Command | Description |
|---|---|
| git-clone(1) | download a repository from a remote system |
| git-checkout(1) | interact with the repository at a certain commit |
| git-log(1) | list commits |
| git-branch(1) | list branches |
The repository mentioned in the prompt can be cloned with the following command.
$ git clone ssh://bandit27-git@localhost:2220/home/bandit27-git/repo
After entering the level password, the git clone should complete with some progress indicators.
remote: Enumerating objects: 3, done.
remote: Counting objects: 100% (3/3), done.
remote: Compressing objects: 100% (2/2), done.
Receiving objects: 100% (3/3), done.
remote: Total 3 (delta 0), reused 0 (delta 0), pack-reused 0
And, there should now be a directory named repo in the current directory.
The repository contains a single README file which contains the password.
$ cat README
The password to the next level is: [REDACTED LEVEL 28 PASSWORD]
Level 28
There is a git repository at
ssh://bandit28-git@localhost/home/bandit28-git/repo via the port 2220. The password for the user bandit28-git is the same as for the userbandit28.Clone the repository and find the password for the next level.
Just as before, clone the repository.
$ git clone ssh://bandit28-git@localhost:2220/home/bandit28-git/repo
This time, the README file contains a password that has been redacted.
# Bandit Notes

Some notes for level29 of bandit.

## credentials

- username: bandit29
- password: xxxxxxxxxx
Examine the change history with the git log command.
commit 674690a00a0056ab96048f7317b9ec20c057c06b (HEAD -> master, origin/master, origin/HEAD)
Author: Morla Porla <morla@overthewire.org>
Date:   Thu Apr 10 14:23:19 2025 +0000

    fix info leak

commit fb0df1358b1ff146f581651a84bae622353a71c0
Author: Morla Porla <morla@overthewire.org>
Date:   Thu Apr 10 14:23:19 2025 +0000

    add missing data

commit a5fdc97aae2c6f0e6c1e722877a100f24bcaaa46
Author: Ben Dover <noone@overthewire.org>
Date:   Thu Apr 10 14:23:19 2025 +0000

    initial commit of README.md
There's a reference to an "info leak" from the previous commit. Check out the previous commit with the git checkout command.
$ git checkout fb0df1358b1ff146f581651a84bae622353a71c0
This will change the repository to its original state at the specified commit hash.
At this point in the repositories history, the bnadit29 password had not yet been redacted in the README file.
# Bandit Notes

Some notes for level29 of bandit.

## credentials

- username: bandit29
- password: [REDACTED LEVEL 29 PASSWORD]
Level 29
There is a git repository at
ssh://bandit29-git@localhost/home/bandit29-git/repo via the port 2220. The password for the user bandit29-git is the same as for the userbandit29.Clone the repository and find the password for the next level.
Clone the repository.
$ git clone ssh://bandit29-git@localhost:2220/home/bandit29-git/repo
Similar to Level 28 there is a README file.
# Bandit Notes

Some notes for bandit30 of bandit.

## credentials

- username: bandit30
- password: <no passwords in production!>
Looking at the log again doesn't turn up anything interesting.
commit 3910630172946c9ffb75842922e394b772c672bd (HEAD)
Author: Ben Dover <noone@overthewire.org>
Date:   Thu Apr 10 14:23:21 2025 +0000

    add gif2ascii

commit 3b8b91fc3c48f1a19d05670fd45d3e3f2621fcfa (origin/master, origin/HEAD, master)
Author: Ben Dover <noone@overthewire.org>
Date:   Thu Apr 10 14:23:21 2025 +0000

    fix username

commit 8d2ffeb5e45f87d0abb028aa796e3ebb63c5579c
Author: Ben Dover <noone@overthewire.org>
Date:   Thu Apr 10 14:23:21 2025 +0000

    initial commit of README.md
This is where some knowledge of Git's branching is useful. By default, the git log command will only display commits from current branch. In this case the master branch.
Use the git branch command to show the active branch.
$ git branch
* master
Additionally using the --all flag will list all the local and remote branches.
$ git branch --all
* master
  remotes/origin/HEAD -> origin/master
  remotes/origin/dev
  remotes/origin/master
  remotes/origin/sploits-dev
You can see here that there are two additional branches mentioned. The dev and sploits-dev branches. Let's check them out.
$ git checkout dev
Switched to branch 'dev'
Your branch is up to date with 'origin/dev'.
commit a97d0dbf8fd910ead6fcf648829ff55c1a629c8e (HEAD -> dev, origin/dev)
Author: Morla Porla <morla@overthewire.org>
Date:   Thu Apr 10 14:23:21 2025 +0000

    add data needed for development

commit 3910630172946c9ffb75842922e394b772c672bd
Author: Ben Dover <noone@overthewire.org>
Date:   Thu Apr 10 14:23:21 2025 +0000

    add gif2ascii

commit 3b8b91fc3c48f1a19d05670fd45d3e3f2621fcfa (origin/master, origin/HEAD, master)
Author: Ben Dover <noone@overthewire.org>
Date:   Thu Apr 10 14:23:21 2025 +0000

    fix username

commit 8d2ffeb5e45f87d0abb028aa796e3ebb63c5579c
Author: Ben Dover <noone@overthewire.org>
Date:   Thu Apr 10 14:23:21 2025 +0000

    initial commit of README.md
The git show command will print the changes made by the last commit, but you can alternatively, just read the README file while on the dev branch since the last commit contains the password.
commit a97d0dbf8fd910ead6fcf648829ff55c1a629c8e (HEAD -> dev, origin/dev)
Author: Morla Porla <morla@overthewire.org>
Date:   Thu Apr 10 14:23:21 2025 +0000

    add data needed for development

diff --git a/README.md b/README.md
index 1af21d3..bc6ad3d 100644
--- a/README.md
+++ b/README.md
@@ -4,5 +4,5 @@ Some notes for bandit30 of bandit.
 ## credentials

 - username: bandit30
-- password: <no passwords in production!>
+- password: [REDACTED BANDIT 30 PASSWORD]
The password only appears in the dev branch because it was only added in the dev branch, but never actually merged into master.
Level 30
There is a git repository at
ssh://bandit30-git@localhost/home/bandit30-git/repo via the port 2220. The password for the user bandit30-git is the same as for the userbandit30.Clone the repository and find the password for the next level.
Clone the repository.
$ git clone ssh://bandit30-git@localhost:2220/home/bandit30-git/repo
If we run git log --all there doesn't appear to be anything unusual.
This time we'll need to look at something called Tags and a couple new commands.
| Git Command | Description |
|---|---|
| git-tag(1) | create, list, delete or verify tags |
| git-show(1) | show various git object i.e. blobs, commits, tags, and trees |
Here we'll list the existing tags for the repo.
$ git tag
secret
Usually tags are used to mark specific commits, but if you try to git checkout this secret tag you'll get an error saying the reference is not a tree. This means the tag is just a BLOB (Binary Large OBject). You can read more about trees and blobs here.
To show the contents of a blob we can use the git show command which reveals the next password.
$ git show secret
[REDACTED LEVEL 31 PASSWORD]
Level 31
There is a git repository at ssh://bandit31-git@localhost/home/bandit31-git/repo via the port 2220. The password for the user bandit31-git is the same as for the user bandit31.
Clone the repository and find the password for the next level.
Clone the repo.
The README.md tells us to push a file to the remote with some file details.
This time your task is to push a file to the remote repository.

Details:
   File name: key.txt
   Content: 'May I come in?'
   Branch: master
We'll need a couple new commands to do that.
| Git Command | Description |
|---|---|
| git-status(1) | display the status of the working tree |
| git-add(1) | add files to the staging area |
| git-push(1) | create a new commit based on the current changes and add a commit message |
Next we need to create the key.txt file.
$ echo "May I come in?" > key.txt
Then add the key.txt to our index.
$ git add key.txt
The following paths are ignored by one of your .gitignore files:
key.txt
hint: Use -f if you really want to add them.
hint: Turn this message off by running
hint: "git config advice.addIgnoredFile false"
You can read more about the mentioned .gitignore files here, but in this case we can just use the recommended -f flag to add the file and try again.
$ git add -f key.txt
We can verify that the key.txt file has been added to the index with git status.
$ git status
On branch master
Your branch is up to date with 'origin/master'.

Changes to be committed:
  (use "git restore --staged <file>..." to unstage)
        new file:   key.txt
Now we need to commit this change with the git commit command. This applies our changes to the master branch.
$ git commit -m "Add key.txt"
[master a1f8c06] Add key.txt
 1 file changed, 1 insertion(+)
 create mode 100644 key.txt
And finally, we can use the git push command to push our new commit to the remote repository.
$ git push origin master
Watch out! If the content of key.txt does not match the prescribed text exactly you may receive an error like this.
Enumerating objects: 4, done.
Counting objects: 100% (4/4), done.
Delta compression using up to 2 threads
Compressing objects: 100% (2/2), done.
Writing objects: 100% (3/3), 323 bytes | 323.00 KiB/s, done.
Total 3 (delta 0), reused 0 (delta 0), pack-reused 0
remote: ### Attempting to validate files... ####
remote:
remote: .oOo.oOo.oOo.oOo.oOo.oOo.oOo.oOo.oOo.oOo.
remote:
remote: Wrong!
remote:
remote: .oOo.oOo.oOo.oOo.oOo.oOo.oOo.oOo.oOo.oOo.
remote:
To ssh://localhost:2220/home/bandit31-git/repo
 ! [remote rejected] master -> master (pre-receive hook declined)
error: failed to push some refs to 'ssh://localhost:2220/home/bandit31-git/repo'
If everything is in order, you'll get some feedback from the git server which will include the next password.
remote: ### Attempting to validate files... ####
remote:
remote: .oOo.oOo.oOo.oOo.oOo.oOo.oOo.oOo.oOo.oOo.
remote:
remote: Well done! Here is the password for the next level:
remote: [REDACTED LEVEL32 PASSWORD]
remote:
remote: .oOo.oOo.oOo.oOo.oOo.oOo.oOo.oOo.oOo.oOo.
remote:
To ssh://localhost:2220/home/bandit31-git/repo
 ! [remote rejected] master -> master (pre-receive hook declined)
error: failed to push some refs to 'ssh://localhost:2220/home/bandit31-git/repo'
Level 32
After all this git stuff, it’s time for another escape. Good luck!
After logging in to bandit32 you'll find yourself in an "UPPERCASE" shell, all entered text appears to be converted to uppercase.
WELCOME TO THE UPPERCASE SHELL
>> cat /etc/passwd
sh: 1: CAT: Permission denied
>>
It's possible to reference some environment variables such as $PATH, $PWD, $SHELL, and $USER.
>> $PATH
sh: 1: /usr/local/sbin:/usr/local/bin:/usr/sbin:/usr/bin:/sbin:/bin:/usr/games:/usr/local/games:/snap/bin: not found
>> $PWD
sh: 1: /home/bandit32: Permission denied
>> $USER
sh: 1: bandit32: Permission denied
You see, just accessing the variable, the Uppercase Shell tries to execute the contents seemingly with the sh shell. This is great, but not enough.
You have to know about a special shell variable, $0. The $0 shell variable expands to the name of the shell or shell script being executed which in this case is sh.
Therefore, providing the $0 variable will execute the sh command dropping us into a normal shell.
>> $0
$
From here's it's just a matter of printing the next password from the file as we've done many times before.
$ cat /etc/bandit_pass/bandit33
[REDACTED LEVEL33 PASSWORD]
The End
Congratulations! You made it! I hope you had fun working through all these challenges. There were a couple tricky ones that I didn't get them all myself on the first time around.
If this wargame has piqued your interest I've also written a couple other walkthroughs.
If the OverTheWire wargames aren't quite your cup of tea though, then I highly recommend the picoCTF platform run by Carnegie Mellon University. They host an annual CTF event, but challenges from previous years are all available to practice. The picoCTF challenges cover a wide range of topics and levels of difficulty so that anyone can find something interesting.
Finally, a big thanks to the folks at OverTheWire for maintaining the infrastructure for the OverTheWire wargames. They're such a great resource for folks first dipping their toes into cybersecurity and CTFs.
Happy hacking!